Friday, November 25, 2011

Magic Shoes

I yearned for Emerald Green Glitter Shoes. Maybe it's the holiday season. Maybe it's because I like glitter. And shoes. And glittery shoes. So I made these...


I love they way they turned out. They look magical and green (really green) and lovely. The sort of shoes one wears to a Christmas party in Oz. Plus they were so simple to make! Here is what I used:

I knew that, in order for the shoes to be wearable, they had to be waterproof, flexible and not leave glitter behind everywhere I trod. I needed the right bonding agent for the job. I hopped in my car and made a trip to my local Joann's Craft Store (with coupon in hand) and went to the glitter aisle.

They had just what I needed; Glitter Bond! The directions on the package assured me that, when dry, the piece would be flexible and waterproof and the glitter would be permanently bonded to the surface. Sold.

I went home and got out my shoes. I covered a TV tray with some newspaper and got to work. First I had to remove the embellishments on the shoes. That was easily accomplished with a pair of small scissors. I snipped it away and set the rings aside to use later. I thought they might come in handy.
 
Then I started to apply the glue. I used the sponge brush and added a thin layer to the surface of the shoe. You can see where the embellishment was removed. That was no big deal. The glue and glitter covered it nicely.

To add the glitter, I just set the shoe on a magazine page and sprinkled it on. Then I tapped the excess off onto the magazine page and poured it back into the glitter tube. Since it was glossy paper, the glitter didn't stick to it, but slid easily back into the tube.

I kept going around the shoes, switching back and forth between them to let one section dry while I worked on the other shoe. Overall, the glitter bonded really well the first time around. I only went back in and touched up a couple of places that needed more glitter.

While the shoes were drying, I glammed up the feather pads with some rhinestones. I placed each stone with tweezers and used the heat tool to stick them in place. It's pretty easy to use. Just press down on the top of the crystal and the adhesive melts and sticks immediately.

I glittered the rings and added them to the feathers with hot glue. I put the feathers on shoe clips so I could wear the shoes with or without the extra adornment.

I let everything dry overnight. The glitter is really bonded and the shoe is nice and flexible. They are ready to wear. On to adventure in magic shoes! Happy Holidays and pay no attention to the man behind the curtain!

Thursday, November 17, 2011

Creative Space

I love my creative space. I like peeking into the spaces that spark creativity and thought you might like to see where I talk to my muse.

Click on the photos to enlarge.

This is my worktable. I like everything to have its own space so I can find it when I need it. Having an organized work area is a big help to my creative process. Since I have everything handy and it is usually fairly neat(ish), I can jump in and work when the mood strikes.

It took me a while to come up with this configuration and it still needs a few tweaks, but so far this works for me.

I like to do the majority of my designing and metalwork standing up, but also have a high stool that I can pull in when I feel like sitting.

The baskets on the bottom shelves house tools, a few display items, my tumbler and my dremel. The drawers hold my dapping blocks, small hand tools, metal stamps and other essentials.


The three shelves above my worktable display my favorite jewelry pieces and other fanciful objects that I like to have hanging around. Those pieces of blue pottery (from when I was little) give my space a sense of whimsy and add a splash of color. I love that dancing lady. Yes. Those are spindles on the left. The crochet covered rock is from my super talented friend Susan.


I like to have a pretty display near my workspace to help to inspire me. I like how everything seems at home on these shelves. I like to pull inspiration for designs from jewelry I have made in the past, so I have some pieces on display here. You may have noticed I also have a thing for small leather carryalls. I found both these vintage pieces ages ago and now use them to carry my pliers when I teach on the road. Another blue glass piece off to the right. You can never have too much blue glass pottery!


I also like to keep magazines and books featuring my designs stored close by. Sometimes, when self doubt threatens the creative process, I like to look at them and see my name printed on shiny paper that did not come out of my own printer. That row of houses is a favorite toy from childhood. Many hours were spent making a village with those houses and trinkets that I would find around the house. I think they were a gift from my mom when I was two? Three? She has excellent taste in gifts. There is another spindle and some yarn I spun stacked up there, too.


I have my sketch/idea book and collection of Sharpie markers. Sharpies are some of my most favorite things ever.


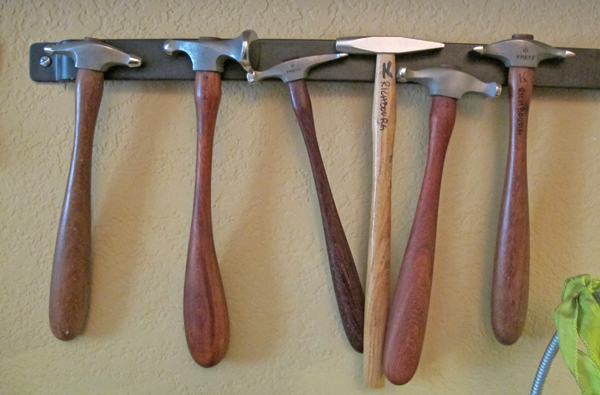
And my tools on magnetic strips so they will all be in reach. Those lovely carving tools were hand made by master metalworker Bob Burkett.


Hammers. Mostly Fretz.


Pliers. Mostly Lindstrom.

Everything ready for me make to something special.

Where do you create? What is your favorite feature about your creative space? What does your dream space look like?

If you are feeling creative this weekend, come spend some time with me. I'll be packing up some of these tools and heading over to Bead Inspirations in Alameda, CA for a creative metalworking day. All the details are here.

Monday, November 14, 2011

It's a Pin!

Thanks for the creative push on my October Challenge project. You all suggested the finished component should turn into a brooch or pin. So without further ado...

TAHDAH!


Here it is. I was kind of stumped about how to turn it into a pin, but I had a recent discussion with my friend Susan (Hi Susan!) on the merits of shawl pins. I like shawls and my aforementioned friend has gifted me with several. A few lightning fast neuron synapses later and this shawl pin was born.

I love the stitched leather component, but just wasn't sure how I was going to mount it to be sturdy enough to wear. As I was unpacking my tools and materials from my teaching gig last weekend I came across a couple of copper scraps that became my starting point.

The two triangles were originally a 1" square of copper with a heat patina surface. One hole was already in the square, so I popped another one in the opposite corner and cut it in half for two triangles. A quick file of the edges smoothed everything out.

My second scrap was a square of copper that just happened to fit the leather, with a bit of room around the edges. I punched holes top and bottom and sandwiched the leather between the copper triangles and sheet and riveted them in place.

A bit of free-form wire wrapping and the main piece was done.

I used 16-gauge wire for the pin. I hammered, shaped and filed it and added more free-form wrapping at the top.


Here is is all ready to go on my shawl.


It's the perfect day to wear this piece on my lovely shawl from Susan. A good way to brighten up a Monday morning.

Thursday, November 10, 2011

Makin' Beads

Come make beads with me!

I am so excited to teach a class locally. Bead Inspirations, in Alameda CA is hosting a 1-day workshop with me on November 19.  Enrollment is on now and there are a few spaces left.

We are going to have a great time! I am bringing a few extra things to play with in class including some pretty beads to cap.

I just taught this class last weekend at Wiremasters and the students made such LOVELY things. Here are a few samples...


To register contact Bead Inspirations in Alameda. Here is the full class description. Hope to see you there.

Friday, November 4, 2011

October's Reader Challenge REVEAL!

I like to say yes to people. I like to keep busy. I like to participate in group activities and be social. I also like to nap. Which is a good thing, since saying yes, keeping busy and having a really active social life can be really tiring. Hence my love of naps.

Unfortunately all this whooping it up and napping can lead to overcommitment with my free time slipping by too fast.

Right about now I'll bet you are wondering what ANY of this has to do with Andrew Thornton's October Reader's Challenge and can I just post the picture already? 'Cause you have, like, 17 more blogs to visit and only so many hours in a day.

Right. So let me get to it.

I bit off more than I could chew with this project. These busy few weeks have not allowed much extra time. Not only that, the time crunch made me awash in indecision about my design. Those two factors combined to thwart the timeliness of my finished piece.

This is what I have so far.

The beads are all stitched to the piece of metallic leather (because I have had leather on my mind lately). That is a river pebble underneath the stitching and a key pendant because I like keys. It's about 2"x 2" or so.

This is where you all come in. I need a push in the right direction. My goal is to finish this piece by next Thursday, November 10. Your job (should you accept it) is to leave a comment and tell me if you think this piece should evolve into a pendant/necklace, bracelet or a brooch.

I will tally up this Sunday night, November 6 and complete the piece in the style that gets the most votes.

I'll reveal the results on Friday November 11.

Thanks for your help! Don't forget to visit the other fine folks participating in this challenge.  Check out the list:


Wednesday, November 2, 2011

Driving Ambition.

I love a road trip: the gas station coffee, reading unfamiliar road signs, the fruitless search for NPR in the vast air wave wasteland that is California's Interstate 5.

No, seriously. When I was little, I remember being snuggled up in the back seat of my grandparents Dodge Monaco with my stuffed animal friends watching the world go by.

Now I am in the driver's seat, but viewing the world through a windshield is still one of my favorite experiences.

So what does this rambling post have to do with Wednesday, November 2, you ask? Well, it's Weekend with the Wiremasters travel day and that means ROADTRIP!

My classes start tomorrow, so I am up bright and early to pack the car, gas her up, pick up my dear traveling companion, and set out for parts unknown. (Actually the parts are pretty known to you NorCal peeps. US 101 to 152 and then on to the interminable I5. YEEK!)

Tomorrow I start a 4-day class extravaganza. If you haven't read about the event, check it out here. I am teaching 4 fabulous metalworking classes including my über-creative, throw-caution-to-the-wind Rolled and Wrapped beads. I rarely teach this class and it is one of my favorites.


Okay gang. Enough for this morning. I'll let you know how it's going. But I suspect it will go pretty well. After all, it's gonna be rough hanging out here for the next few days...

...but I will do my best.